If you love a DIY approach, you want to learn how to put LED lights on the ceiling. After all, what better way to add style and an extra touch to your home than with LED lights?
But while some installations are relatively easy, installing strip lights on the ceiling can be very challenging.
You might wonder where on the ceiling to place the strip lights and if you must use coving.
This article outlines a step-by-step guide, plus everything else you should know about wiring and mounting LED strip lights on the ceiling.
(Caption: LED strip lights on ceiling)
Wiring and Mounting LED Strip Lights on Ceiling: A Step-By-Step Guide
So you’ve combed the market and found the perfect strip lights, and it’s time to fix them onto your ceiling. Just follow these steps for an excellent installation:
Find the Power Supply
Before you can start installing, first locate your power supply. Remember, LED strips run on low-voltage DC (direct current).
And because home power outlets are almost always AC (alternating current), you require a LED driver to convert the AC to DC.
Also, ensure that all the batteries are in place.
Cut
While LED strip lights come in various sizes, you’ll unlikely find one that fits exactly as you’d like.
Often, you’ll need to cut a strip to get the required size. That’s because you’ll need extra lengths of the strip to cover edges and protruding parts.
Just ensure that you cut the strip at the marked point. Otherwise, you’ll damage the strips.
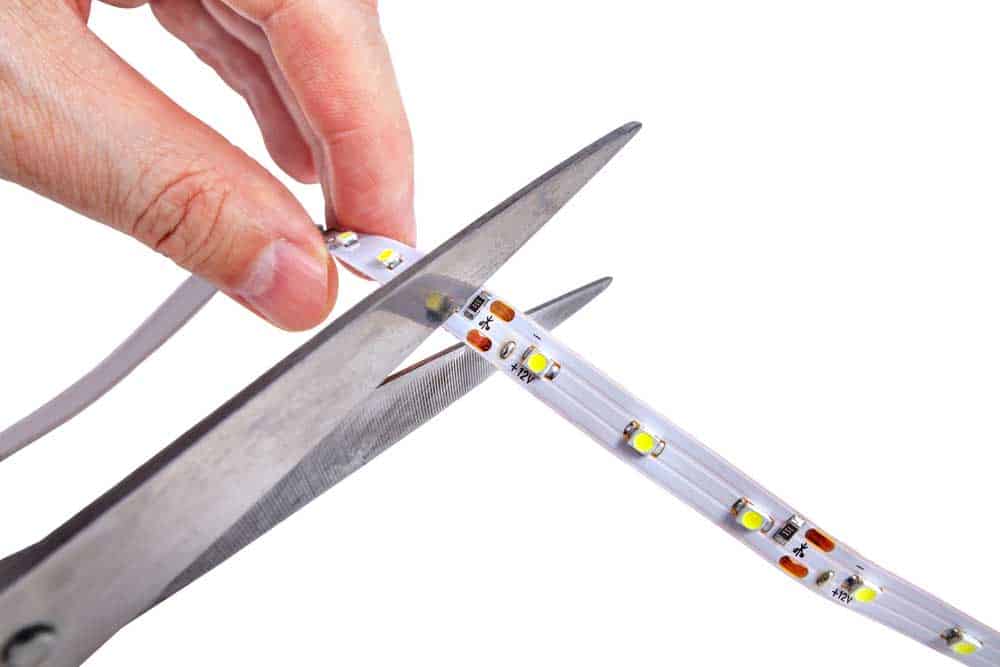
(Caption: Cutting a LED strip along markings)
Remove the Adhesive
If you’re using adhesive-backed strip lights, remove them carefully. Do so by peeling the back of the paper backing to expose the adhesive.
Also, keep the support intact. Otherwise, you’ll make it hard to stick the strip onto the ceiling.
Stick the Lights onto the Ceiling
First, before you can start sticking the strip, check the surface of your ceiling to ensure that it’s clean and without moisture.
Failure to do so would cause the adhesive to wear off quickly.
Next, with your hands on the strip, peel off the back of the adhesive covering while you push the strip onto the ceiling surface.
Now continue doing so until you’re done with the entire strip.
Connect to the Power Supply
Lastly, connect the strip to a power supply. And if the strips are battery-powered, insert the batteries.
If you installed a plug-in-strip, plug the power cord into the power outlet and switch on the lights.
Alternative LED Strip Mounting Methods
More often than not, the adhesive degrades and stops sticking as it should. When that happens, it needs reinforcing. However, it would be better to consider alternative adhesive solutions to ensure they last long without falling off. These include:
- Double-sided tape: As the name suggests, this tape has adhesive on both sides. And as you would expect, it’s strong enough to hold the strip lights for a long time. However, this tape only works for smooth surfaces.
- Foam backing tape: This tape is slightly heavier and stronger than regular double-sided tape. Unlike double-sided tape, this one works for rough surfaces. So if your ceiling has an irregular surface or objects, foam backing tape is perfect for mounting your strip lights.
- LED strip fixing clips: These clips ensure that your strip does not fall off. And the way to use them is by using a screwdriver and screws and fixing the clips at an interval of one foot from one end to the other. As a matter of fact, the clips are excellent for your downward fixing.
How to Hide LED Strip Lights on Ceiling
Because the LED strip lights won’t always stay on, it would be best if they stay hidden.
See, you want your friends to be pleasantly surprised when the lights come on and they see the beautiful ambiance the lighting creates.
Also, you want to ensure that all the components stay hidden from view as they’re an eyesore when exposed.
Now there are two ways you can hide the strips. One, you can use the drop-down ceiling mounting in your room.
Alternatively, you can use coving. It provides extra space for hiding the strip lights.
The aluminum coving has a lip on the side to hide the strips and will likely blend in with your wall. But don’t worry. It does no harm to the light’s glow.
How to Hide LED Strip Lights Connectors
Due to their size and appearance, connectors stand out on a wall after a LED strip lights installation.
But since you cannot do without them, the solution is to hide them.
Thankfully, there are various cord covers available that are compatible with your ceiling colors.
See, these boxes allow you to hide the connectors in distinctive places.
And once you’re done fixing the lights on your ceiling, you can mount the covers using either mounting tape or screws.
Alternatively, you could paint the box to blend in with your paint color. That way, you are able to bring out the beauty of your strip lights.
Where On the Ceiling Should You Place LED Strip Lights?
Interestingly, there are a few factors to keep in mind when deciding where to place LED strip lights. First, ensure that the surface is clean, absolutely dry, and well-ventilated.
In fact, you’ll find that if the room is always well-ventilated, then the surface can stay moisture-free, and so can the lights. Also, avoid stuffy or congested spaces.
Now the ceiling edge is the perfect place to mount strip lights.
Because besides being smooth and uniform, these edges also ensure that the light produced gets distributed uniformly. And that way, it brings out the lights well.
Must You Install LED Strip Lights on the Ceiling With Coving?
Well, you don’t strictly have to install LED lights with coving. It depends on your budget as these incur an extra cost.
As mentioned, coving helps hide the strip lights and it just might be that you love the naked look of the strips. And if that’s the case, there’s no need to hide them.
Simply install a dimmer switch to regulate the brightness of the strip lights to reduce glare.
But if you want the ceiling lit more, install the lights three to five inches from the ceiling. Also, you can place the strips about a foot below the ceiling.
Doing that provides enough space for the lights to glow upwards.
That said, the installation depends primarily on whether you have a drop-down, false, or suspended ceiling.
How to Get the Most Out of Your LED Lights
Here’s what you can do to get the best out of your newly installed LED strip lights:
- Install a dimmer switch: With a dimmer, you can change the waveform of the voltage applied to the strip lights, lowering the brightness.
- Use colored LEDs: By using colored strip lights, also known as color-changing lights, you add fun and depth to a room. Also, you get to change the lighting color to fit different moods and occasions.

(Caption: Colord LED strips)
- Install motion detectors: When you install motion sensors in the room, the LEDs turn on automatically when you approach them. That way, the lights turn on when you need them and stay off when there’s no one in the room.
- Add a timer: Just imagine how great it is when your lights turn on exactly when you want them to. This is possible with a timer, which turns on and off the LED lights at the exact time you set them.
- A remote control: With a remote control, you can change the color and brightness of the lights in the most convenient way possible.

(Caption: Remote controlled LED strip lights)
FAQs
What Is the Best Way to Put LED Lights In a Room?
As mentioned earlier, the adhesive that comes with the strips wears off pretty fast. Therefore, it’s best to reinforce it.
To do so, depending on how smooth or rough the surface is, you can use double-sided tape or foam backing tape to ensure the strips stick better.
Also, you can use LED strip fixing clips.
How Do You Install LED Lights?
To install LED lights, first, measure the surface onto which you plan to mount the lights. Next, cut the strip length that you need as per the measurements you took.
Now remove the adhesive cover carefully and press the strip onto the surface from one edge as you move forward to the other end.
Conclusion
That’s it on how to put LED lights on the ceiling. Just follow the step-by-step guide outlined above.
And for longer-lasting strips, reinforce the adhesive using tape, specifically double-sided or foam backing, or clips designed specifically for strip fixing.
Also, using a dimmer switch, color-changing LEDs, motion sensors, timer, and remote control helps you get the best experience from your LED strip lights.